Manual of Ti 84 Online Calculator
Here is the short manual of the Ti 84 Calculator Online. Some important steps and guidelines are given below
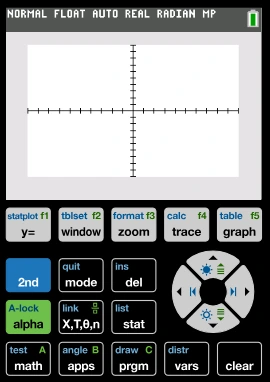
Step 1: Display Screen Area
- Location: Top white rectangular section.
- Purpose: Shows results, graphs, menus, and messages like “RAM Cleared.”
- Tip: The top status bar displays calculator mode — NORMAL / FLOAT / AUTO / REAL / RADIAN/MP.
- Use: View entered equations, solutions, tables, or graphs here.

Step 2: Function Row (Blue Labels f1–f5)
- Keys: Y=, window, zoom, trace, graph
- Purpose: These five keys control the graphing interface.
- Y= Open function editor to enter equations.
- Window – Adjust Xmin, Xmax, Ymin, Ymax.
- Zoom – Quickly fit graphs or standardize view.
- Trace – Move along graph to view coordinates.
- Graph – Draw the entered functions.

Step 3: Secondary Function Keys
- Blue [2nd] key – Activates the blue text above keys.
- Green [ALPHA] key – Activates green text (letters & variables).
- Note: The small text color matches the activating key color.
- Example: Press
[2nd]→[MODE]= QUIT. - Example: Press
[ALPHA]→[X,T,θ,n]= Type variable.
- Example: Press

Step 4: Mode & Settings Section
- Keys:
MODE,DEL,STAT - Purpose:
- MODE – Change between Degree/Radian, Normal/Sci, Func/Par/Pol.
- DEL – Delete characters or list items.
- STAT – Open statistics menu (lists, 1-Var Stats, regressions).

Step 5: Navigation Pad (Arrow Keys)
- Up / Down / Left / Right arrows
- Used for:
- Moving in menus or the graph window
- Scrolling through history or lists
- Tracing points on a graph
- Center: No key — directional navigation only.

Step 6: MATH, APPS, PRGM, VARS, CLEAR Row
- MATH – Opens math menu (fractions, roots, solver).
- APPS – Access installed applications.
- PRGM – Programming editor (create or run programs).
- VARS – Access stored variables, window settings, and stat variables.
- CLEAR – Clears the current entry or home screen.

Step 7: Trigonometric & Power Keys
- Left Section (black area):
x⁻¹,x²,√x,10^x,e^x,log,ln

- Middle Section:
sin,cos,tan(and inverse via[2nd])- Parentheses
( ), exponent^, π constant.
- These are used for algebra, trigonometry, and scientific computations.

Step 8: Numeric Keypad
- Keys: 0–9
- Includes:
.(decimal point),(-)(negative sign),,(comma)EE– Enters scientific notation ×10ⁿ- Tip: For
π, press[2nd]→^key.

Memory & List Keys
L1,L2,L3,L4,L5,L6– Access lists for statistics.STO▶– Store a value into a variable (e.g.,5 STO▶ A).[2nd]→MEM– Access memory management & reset.
Step 9: Bottom Row — Control & Entry
- [ON] – Power ON/OFF.
- [0] – Zero key (also used for letter “O” in Alpha mode).
- [.] – Decimal point.
- [(-)] – Negative sign (not subtraction).
- [ENTER] – Executes commands or calculations (green label entry/solve).

Step 10: Using [2nd] and [ALPHA] Efficiently
- Press [2nd] once → activates blue functions for the next key only.
- Press [ALPHA] once → type one letter; press twice → alpha lock (A-lock ON).
- Example:
[ALPHA]→[APPS]→ types “A”.[2nd]→[GRAPH]→ opens Table.
Step 11: Example — Plot a Graph
- Press [Y=]
- Enter
X² + 2X + 1 - Press [GRAPH] to view parabola.
- Use [TRACE] to move along the curve.
- Adjust range via [WINDOW].
Step 12: Resetting the Calculator
[2nd]→[MEM]→7:Reset- Choose
All RAM→ ENTER → Confirm - Screen will show RAM CLEAR (as shown in step 1).
Ti 84 Calculator Online vs Ti-84 Plus CE – Which one should you use online?
A Practical Comparison for Students & Teachers
The Ti 84 family has several models, but the two most popular are:
- Ti 84 Plus
- Ti 84 Plus CE
Here’s a simple comparison to help learners decide.
🔷 1. Display Quality
Ti 84 Plus:
- Basic grayscale
- Slower refresh rate
Ti 84 Plus CE:
- Bright color display
- Smoother graphing
- Faster processing
Online Advantage:
The Ti 84 Online Calculator offers a crystal clear digital display which replicates the best features from both.
🔷 2. Speed & Performance
Although CE model is faster, but online calculators run on modern systems so they outperform physical models.
🔷 3. Graphing Smoothness
Color graphs are easier to understand, but the online version offers a clean, high-contrast graph that’s even easier to read.
🔷 4. Memory & Storage
Physical calculators have limited storage due to their size and specifications cost whereas online calculators don’t everything loads instantly.
🏆 Verdict
The Ti 84 Online Calculator gives you:
- faster processing
- clearer graphs
- easy access
- no hardware and storage limits
So if you’re practicing, studying, or doing homework, the online version wins easily due to its versatility.
Disclaimer: This guide is independently written for educational purposes and is not affiliated with or endorsed by Texas Instruments.